Deep Dive into Machine Learning: Support Vector Machine
Note: While learning the topic, I prepared the note for my easy reference by referring various sources. Hopefully, this will be helpful to others too to understand the algorithm in the simple manner.

What is Support Vector Machine:
A support vector machine (SVM) is a supervised machine learning algorithm that classifies data by finding the best hyperplane to separate it into classes.
When to use Support Vector Machine:
Support vector machines are particularly good at binary classification problems.
Example:
Let’s say, the emails need to be identified as spam or not spam. Support Vetor Machine can be used to identify this.
When not to use Support Vector Machine:
· Support Vector Machines (SVMs) are not suitable for large datasets.
· SVMs are sensitive to noise, making them prone to overfitting.
How Support Vector Machine Works:
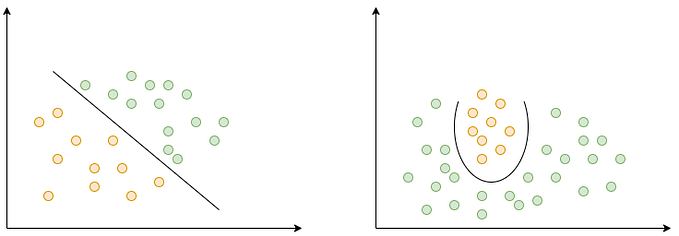
- Map data to a higher-dimensional space:
SVMs transform data into a higher-dimensional feature space to make it easier to separate the data into categories.
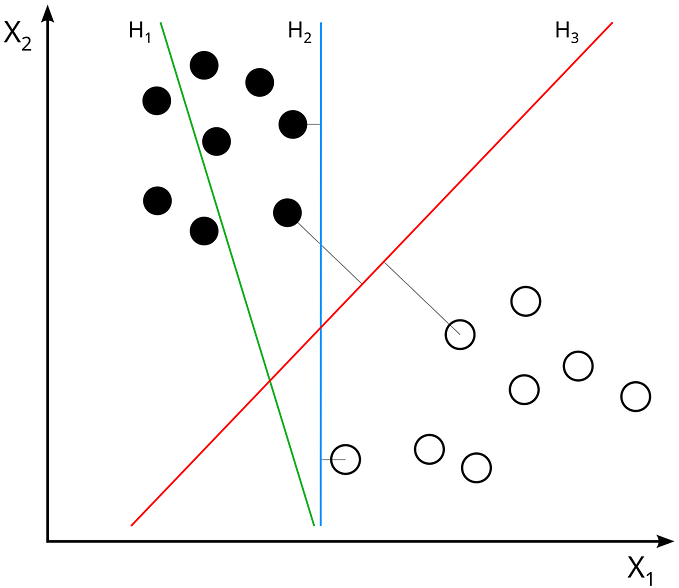
- Find the optimal hyperplane:
SVMs find the hyperplane that maximizes the distance between the closest data points of different classes.
- Use support vectors:
SVMs use lines adjacent to the optimal hyperplane as support vectors.
- Classify new data:
SVMs use the hyperplane to classify new data points based on their position relative to the hyperplane.
Steps to implement Support Vector Machine:
import libraries:
import pandas as pd
import numpy as np
import seaborn as sns
import matplitlib.pyplot as plt
%matplotlib inline
Load the data
from sklearn.datasets import load_breast_cancer
cancer = load_breast_cancer()
Check the keys in the data set
cancer.keys()
Create a dataframe
df_feat = pd.DataFrame(cancer[‘data’],columns=cancer[‘feature_names’])
Verify the target names
print(cancer[‘target_names’])
Now its time to split our data into a training set and a testing set!
from sklearn.model_selection import train_test_split
X = df_feat
y = cancer[‘target’]
X_train, X_test, y_train, y_test = train_test_split(X, y, test_size=0.3, random_state=101)
Implement Support Vector Machine
from sklearn.svm import SVC
Initialize Support Vector Machine
model = SVC()
Fit Support Vector Machine to the features.
model.fit(X_train, y_train)
Predict the Support Vector Machine Outcome
pred = model.predict(X_test)
Verify the classification report and confusion matrix
from sklearn.metrics import classification_report, confusion_matrix
print(confusion_matrix(pred,y_test))
print(classification_report(pred,y_test))
Steps to implement Grid Search
Import the Grid Search classifier
from sklearn.model_selection import GridSearchCV
Create Set C and gamma values
param_grid = {‘C’:[0.1,1,10,100,1000],’gamma’:[1,0.1,0.01,0.001,0.0001]}
Implement Grid Serach
grid = GridSearchCV(SVC(),param_grid,verbose=3)
Train the model
grid.fit(X_train, y_train)
Find the grid best optimized C and gamma values
grid.best_params_
grid.best_estimator_
Predict the Grid Search Outcome
grid_predictions = grid.predict(X_test)
Print the confusion matrix and classification report
print(confusion_matrix(y_test,rfc_pred ))
print(classification_report(y_test,rfc_pred ))
Compare the performance of the support vector machine before and after implementing grid search. Generally, the performance is better after implementing the grid search.
Conclusion: Support vector machine is easy to implement. We need to implement this model when that classifies data by finding the best hyperplane to separate it into classes.
The GitHub link for working notebook of support vector machine